Process Photographs: Multnomah Falls
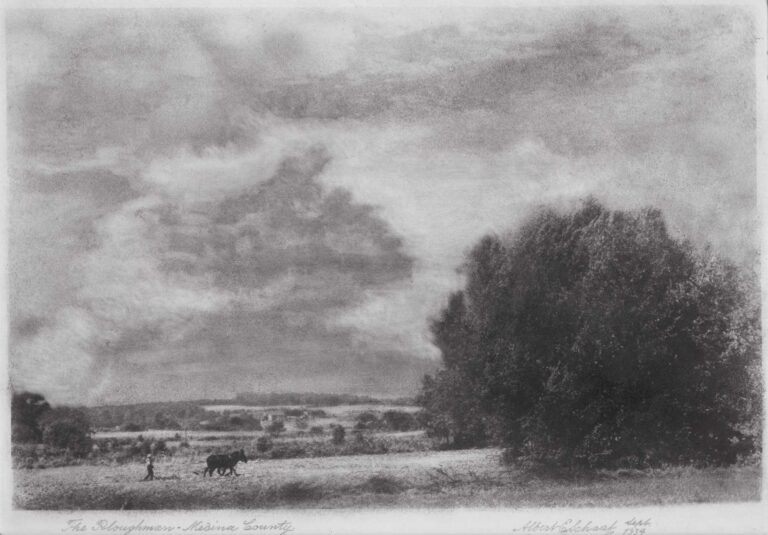
These photographs of Multnomah Falls in Oregon date to the early 1930’s. They are work prints from the same negative, with the photograph at right an enlargement centered on the falls pedestrian bridge and water flowing below. Under his sometimes used pen-name “C.H. Fitzpatrick”, Sigismund Blumann made the prints in preparation for making what he called a “Dry Point Etching”- basically a bleached-out and toned line drawing retaining the photograph’s original features, but with selective additions and omissions. (people removed, trees added, etc.) A larger photograph of Multnomah Falls and its sister “etching” were used along with other examples for his article: “Etchings From and With Photographs” in his magazine: Photo Art Monthly, published in July, 1934.
The article in full by C.H. Fitzpatrick (Sigismund Blumann):
The illustration of Multnomah Falls will in itself immediately make the process plain and simple. Number one shows the enlarged photograph as it is before any treatment. Number two is the finished product, ink-drawn and with the silver image bleached out leaving a true line drawing which on being rephotographed in reduced scale gives all the effects of a dry-point etching with very fine lines.
This print has been reduced to one-eighth size of original and you are invited to note the fineness of the lines and the exquisite effect of this minutae. The beauty lies in the thing itself as much or more than in any remarkable artistic ability of the maker. In fact my claim is rather for patience and care than for outstanding skill, though years of practice and an ever growing fond, ness for the work have improved my technique greatly.
In making the original enlargement a fine matt surface and clear white paper should be selected. Expose for full detail but do not overprint and by all means develop for lighter tones than if you intended the picture to remain as a bromide print. Fix, wash and dryas usual, then outline the image and crosshatch the shadows using a tested waterproof drawing ink and a Croquille pen for the finer work and a Gillot number 303 for the heavier lines.
A little practice will start you on the way to perfection. It is not too short a road and that is fortunate. If the thing were very easy everyone should be doing it and there would be less pleasure in finally achieving a real photo-etching, Remember not to overdo your working in of lines.
The white paper is as much a part of the picture as the black lines. When the drawing is finished allow the ink to dry for several hours, —overnight is better, then immerse it in a bleaching solution until all of the photograph is gone and only the pen and ink line work remains.
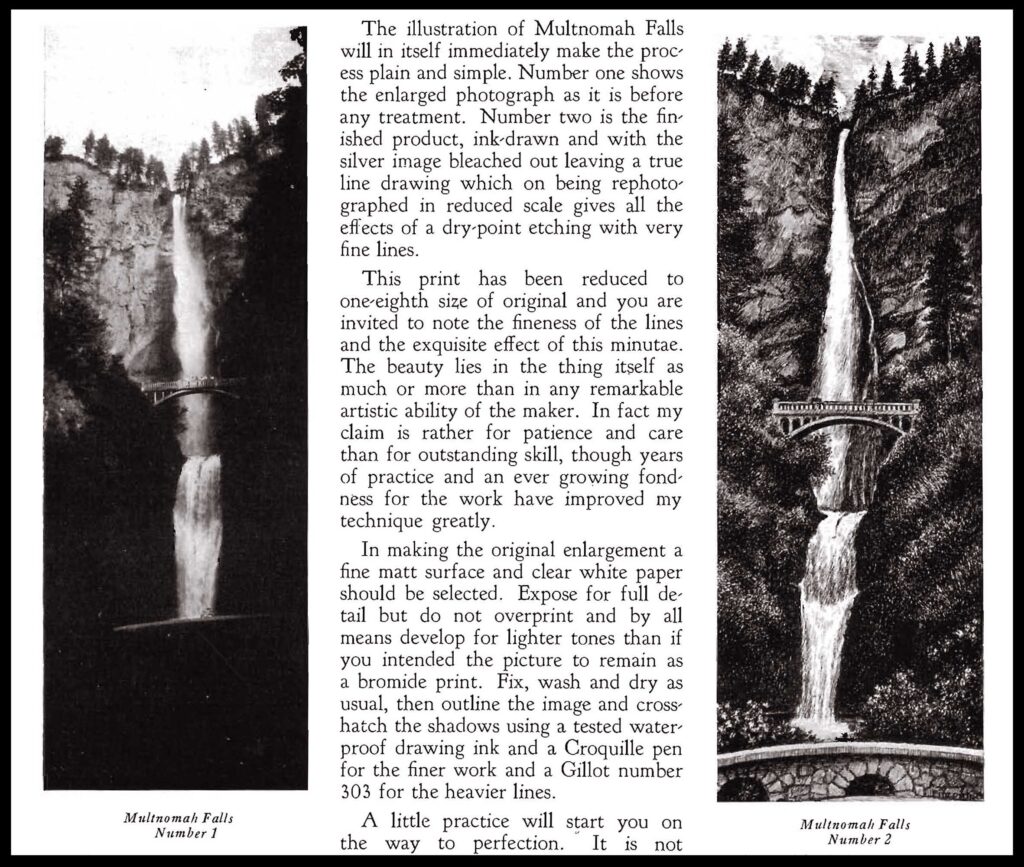
The original panoramic view of Multnomah Falls by Sigismund Blumann at left, and the finished “dry point etching” of the same scene at right. From Photo Art Monthly, July, 1934: courtesy Thomas High.
Wash out the bleaching solution in running water or better in successive changes of still water. Running water has been known to smudge the ink.
When the treated print has been dried and flattened it is to be copied to whatever size you choose. Too great a reduction will give the effect of lines running together and so blocking out the interstices of white. Too nearly the same size will make the line work seem coarse and crude. In fact it is well to determine in advance how much or little reduction you want and to do the line drawing, close or spread out accordingly.
In making the copy negative use a process emulsion on plate or film and be punctilious in your focussing. The print must be absolutely on a plane with the negative plane or there will be distortion and blurred lines. To know when this plane is achieved you need only watch the image on the ground glass. When the image is absolutely squared all is well.
As a help in selecting reduction factors let me say that working as I do, a 60 by 80 or an 8 by 10 worked-up picture reduces best to about 4 by 5. This is not arbitrarily fixed and may be varied as has been said to suit the worker’s taste and the nature of the subject and its treatment.
Develop this copy negative for contrast, aiming to get clear glass and well built up deposits in the black portions. The idea is to be able to print with ease and get black lines on a pure white ground. Should the clear parts of this negative fog over all is not lost for it may be cleared and improved wonderfully with Farmer’s Reducer. Use an 8 by 10 frame in which you have a mask with a 4 by 5 opening, or whatever size opening you prefer and make your etching prints on paper of sufficient size to offer a large margin all round. This print is treated through all the usual solutions in the usual way and may be developed in any of the prescribed formulae for blue-black, jet-black, warm-black, or dark brown tones. Or it may be subsequently toned by the bleach and redevelop methods. The particular brown of an etching is easily gotten on Vitava Athena with a developer containing Athenon.
Azo P-2 or 3, Vitava Athena E, Novira in the matt smooth or rough are all fine for the purpose. Gevalux gives a wonderful image in a true carbon black color and velvet crayon patine.
When dry the plate-sink of a true etching may be obtained in the manner explained in the Velox Book or any instruction book on printing. And now your picture is ready for framing. If you have proceeded carefully and have the requisite skill it will be well worth a good frame.
The bleaching solution is as follows:
A. Potassium ferricyanide …………30 grains
Water ……………..1 ounce
B. Hypo ……………..1 ounce
Water……………………30 ounces
Dissolve thoroughly and keep in well stoppered bottles away from the light. When ready to use add A to B and mix well. Bleaching should be completed in about three minutes and six changes of water should effectively wash the chemicals out of the emulsion and paper. Hang print up to dry being scrupulously careful not to touch the surface with finger or anything. When dry touching up and adding lines is possible by use of the same pens and ink as previously used. If the subject is worth the trouble much added work may be put on this print and another copy negative be made.
The Farmer’s reducer spoken of is the same as the bleach only in diluted form. Put the negative to be cleared in some of the A solution to which three times as much water has been added, soak for a minute or two and then immerse without rinsing in a requisite amount of the B solution full strength. Reduction follows very rapidly and should be watched. Sometimes just a few seconds in the B solution does the trick.
That is all there is to the whole thing. You could not complicate it if you tried. Just make an enlargement, work on it with pen and ink, bleach out the silver leaving the ink image, photograph the line drawing, make as many etching-prints from the copy negative as you wish. Where can you go wrong? How can you fail?
Furthermore, should you desire to print on colored papers or card- board of such surface as cannot be bought ready sensitized it will be a simple matter to sensitize any stock with the well known Blue Print solutions, or if the various shades of brown and black are wanted to resort to Kallitype. These processes are as cheap as they are easy to compound and use; they work on any paper not too saturated with chlorides or unfixed dyes. Kallitype is moreover a beautiful process in itself and prints endure according to the care in making them. (pp. 307-313)